Title: Linkbox Widget plug-in
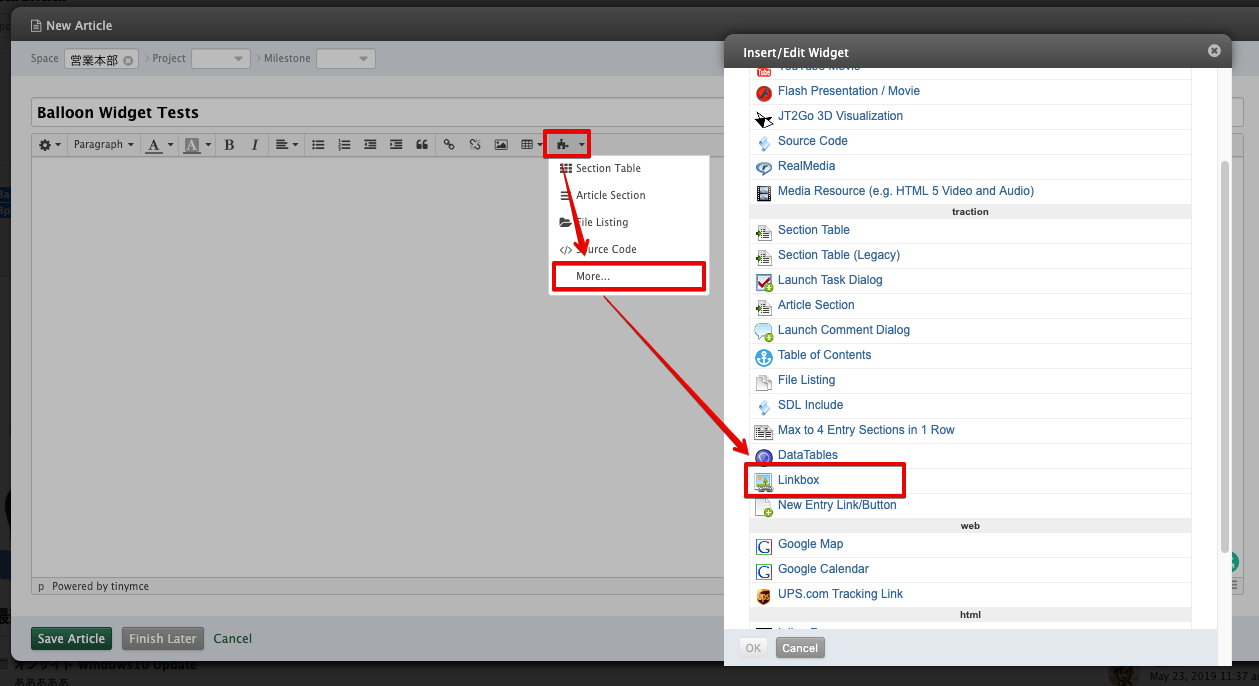
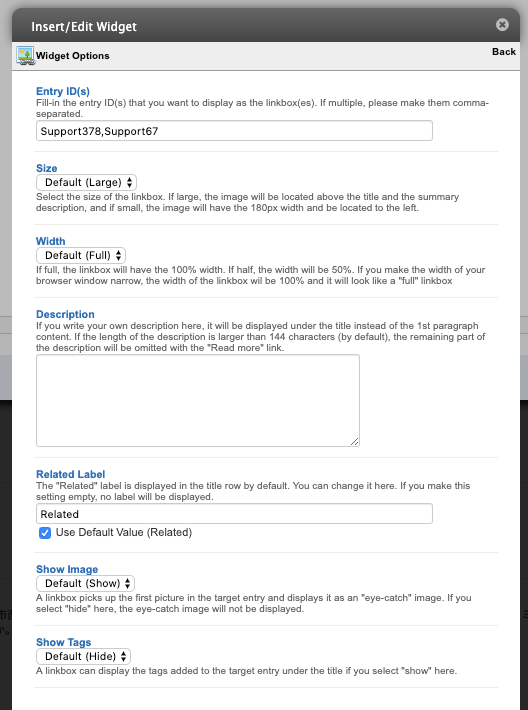
This plug-in provides the "linkbox" widget that is an embedded link to another entry (e.g. article, task, event, goal, etc) and displayed as a kind of "box" or "card" in the body content of the entry.
The basic and normal link in a TeamPage entry is something like this -- Forum6831: Questionnaire Form Plug-in -- but don't you think it is too simple? You may think...
(1) I can see the title of the target entry only. I want its summary so that I can catch it up before clicking the link.
(2) The link doesn't show its submission date (and update date). I can't see whether the target article is new or old until I open it.
(3) If the link shows an eye-catch image, it would be very nice.
So here is the answer. Use this widget to make links fancy!
Install
Main unit
Click the link below to download the .zip file of this plug-in.
Widget
If you want to use the widget for the linkbox (the setting dialog for the linkbox), please install the following zip file as well.
How to install
Log in to your TeamPage server and open Server Settings > Plugins. Select the .zip file(s) and upload it.
After upload, you will see the I18N error, but don't worry. This error means just the language files (locale files) have not loaded yet.
Open Server Settings > General > Manage Server page and click the "Restart TeamPage" button so that TeamPage server loads the language files.
If your TeamPage is hosted in Traction's cloud environment, you will need to restart twice.
Then open Server Settings > Plugins page again to find "Linkbox Widget" plug-in is available.
Howtos
Without The Widget
Without the widget, you have to type the following "command" to insert a linkbox.
The benefit of not using the widget is that you can always see and check the content of your balloon easily because the richtext editor (TinyMCE) never converts your "command" to a widget icon.
The Simplest Format
You must double-parenthesize the widget name "linkbox" with a slash character and the ID (Traction ID) of the target entry.
[[ /linkbox EntryId ]]
The detailed Format
You can add the options (parameters) as you like. Please read the following section for details.
[[ /linkbox entry="EntryId" size="[large]/small" width="[full]/small" desc="Something..." label="Read this article!" image="[show]/hide" tag="show/[hide]" ]]
Options
entry="TractionID"
Specify the ID of the target entry. If you want to specify multiple entries, please combine the IDs with comma characters. (e.g. entry="foo123,bar456,buz789")
size="[large]/small"
Select the "size" of the linkbox.
- Large: An eye-catch image with the 100% width. The title is located under the eye-catch image and the date(s) and the summary description follows the title.
- Small: An eye-catch image locates to the left with the 180 pixels width and the others (title, dates, tags, and description) locates to the right. If you make the width of your browser window narrow, the location rule which moves the eye-catch image to the left and the others to the right will be ignored and the small linkbox looks like a "large" linkbox.
width="[full]/half"
Select the "width" of the linkbox.
- Full: The linkbox will have the 100% width.
- Half: The width will be 50%. If you make the width of your browser window narrow, the width of the linkbox wil be 100% and it will look like a "full" linkbox.
desc="Something..."
A linkbox displays the short description (= the 1st paragraph content) of the target entry under the title by default. If you write your own description with this desc=
option, it will be displayed under the title instead of the 1st paragraph content.
If the length of the description is larger than 144 characters, the remaining part of the description will be omitted with the "Read more" link. You can change the threshold value in the plugin's configuration. (Go to the Server Settings > Plugins page and click the [configure] link in this plugin.)
label="something or nothing"
The "Related" label is displayed in the title row by default. You can change the description of the label. If you set label="", no label will be displayed.
image="[show]/hide"
A linkbox picks up the first picture in the target entry and displays it as an "eye-catch" image. If you set image="hide", the eye-catch image will not be displayed.
tag="show/[hide]"
A linkbox can display the tags added to the target entry under the title if you set tag="show"
. Please note that you should use the tag=
option rather than the tags=
option. (singular)
With The Widget
To insert a linkbox widget, display the "Insert/Edit Widget" dialog and select "Linkbox".
Enter the ID(s) of the target entry, select options, and click "OK".
Then you will see that the widget is inserted into the body text.
Examples
Here are several live examples of the linkboxes.
One large linkbox
[[ /linkbox Forum6831 ]]
April 30, 2017
June 7, 2019
This plug-in lets people carry out questionnaire surveys for various purposes and features; 1. Single selection and ...
Read more
Two half-width linkboxes, large
[[ /linkbox entry="Forum6862,Forum6820" size="large" width="half" ]]
April 16, 2017
September 19, 2018
This plugin, Schedule Aggregation or Events Aggregation plug-in, automatically calculates how many hours people worked ...
Read more
Two half-width linkboxes, small, the label says "😀", with tags
[[ /linkbox entry="Forum6608,Forum6613" size="small" width="half" label=":-)" tag="show" ]]
April 5, 2016
June 19, 2019
[inventory_image.jpg]This plug-in provides a special type of "inventory" form and entry to manage materials, supplies, products, equipments ...
Read more
This plug-in provides a special type of "item purchase application" form and entry to make an application to purchase something and get ...
Read more