Common File Interface
TeamPage's interface for listing folders and their contents is called the Common File Interface, or CFI for short. The same interface is used for serving both regular and WebDAV-enabled folders. The files and folders that you will be able to access through the CFI depend on your permissions.
Note to administrators: the root folder in the CFI represents the server directory of your TeamPage installation.
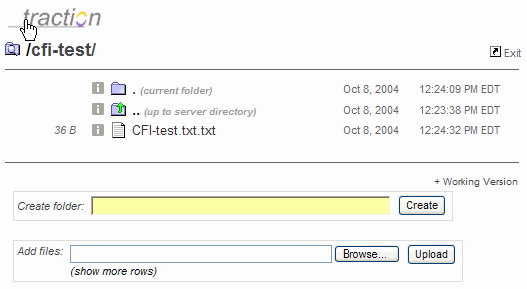
Here is an example of a CFI view:
The CFI shows us some basic information on each file or folder that is contained in the folder being viewed: file size; file lock status; file information link; file type icon; file name; and file modification date and time. If a folder is under WebDAV control, this logo will appear in the upper right corner of its CFI view:
Only WebDAV enabled folders support file versioning, the Easy Edit feature, and viewing in Windows Web Folders or over Macintosh webdavfs. (These topics are covered later in WebDAV help.
Navigating the CFI
If you know the path to the folder you want to view, you can type it directly into your browser's location/
traction.example….
Otherwise, you may have to navigate to the appropriate location. The usual point of entry for accessing the CFI is a project share folder link or an entry share folder link. For more on these, please see the next section, entitled Where are Files Shared and Managed in TeamPage. Once you're in a CFI view, there are two very simple ways to navigate with built-in links in a CFI view.
The first set of built-in navigation links is the name and folder icon
Besides the actual files contained in the folder being viewed, there are two special entries in the top two rows. The first row gives information about the current folder itself, using the familiar file system idiom of a single dot to refer to the current path. Since the current folder is already being viewed, its name and icon do not link to anything:
The second row gives information about the folder that contains the current folder -- or the "parent" folder. If you are viewing the CFI for the root folder ( / ), you will not see the parent folder row, because the root folder, being the root, has no parent folder. The parent folder's icon and name -- ".
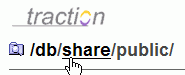
The second simple way to navigate the CFI view is the path declaration, right below the logo in the top left corner of the CFI view:
Each word between the slashes represents the name of a folder. To navigate to that folder, click its name. To navigate to the root folder, click the leading / character in the path. This provides easy navigation of the folders along the path to the current folder, which makes it easy to backtrack by more than one folder at a time.
These views also support some very useful file management operations as explained in File Management with Browsers.
Attachments:
image206.gif
image207.gif
image216.gif
image217.gif
image214.gif
image215.gif
image218.gif
Article: Doc70 (permalink)
Date: March 22, 2008; 3:54:58 PM Eastern Daylight Time
Author Name: Documentation Importer
Author ID: importer
Date: March 22, 2008; 3:54:58 PM Eastern Daylight Time
Author Name: Documentation Importer
Author ID: importer