Apache Solr Reference Guide
The Apache Solr Reference Guide contains thorough and clear documentation related to the topic covered in this document, as well as to other topics related to Solr setup, administration, and usage. Please refer to it for any details not otherwise covered here, or file a support request if you have any other questions.
Binding to a Particular Network Interface
Binding to a particular NIC via a particular host name or IP address is probably a good idea. If, for example, you're only using the Solr service with TeamPage running on the same host, and you don't need need direct remote access (via a browser) the Solr admin UI from a browser (just use a browser on the host itself), you can bind to 127.
This can be done by setting the SOLR_JETTY_HOST= in the Solr command configuration file, e.
# Sets the network interface the Solr binds to. To prevent administrators from
# accidentally exposing Solr more widely than intended, this defaults to 127.0.0.1.
# Administrators should think carefully about their deployment environment and
# set this value as narrowly as required before going to production. In
# environments where security is not a concern, 0.0.0.0 can be used to allow
# Solr to accept connections on all network interfaces.
SOLR_JETTY_HOST="127.0.0.1"
or
# Sets the network interface the Solr binds to. To prevent administrators from
# accidentally exposing Solr more widely than intended, this defaults to 127.0.0.1.
# Administrators should think carefully about their deployment environment and
# set this value as narrowly as required before going to production. In
# environments where security is not a concern, 0.0.0.0 can be used to allow
# Solr to accept connections on all network interfaces.
SOLR_JETTY_HOST="tp-solr1.example.com"
Keep the following in mind:
- The Solr service must be reachable from TeamPage.
- The Solr service should be reachable from a web browser to allow administrators to access the admin UI.
- If you'll be using TLS certificates (see below), you must also ensure that the host name on the certificate is covered by the scope of the bind address. In this case, you may want to use "0.
tp-solr1.example.com . This just means that even if you want to access Solr from a web browser on the same machine where it's hosted, you'll have to use that host name to do so.TLS Certificates
The Solr Reference Guide section on Enabling SSL (TLS) covers this topic in detail, and those details are outside the scope of this guide.
The basic outline is as follows (to be done with Solr offline, naturally):
1. Create or obtain a certificate. If you already have a server key and a certificate you wish to use, you can do so. Otherwise, a qualified administrator should follow the instructions in the Solr Reference Guide to create a server key, generate a CSR, get the key signed, and retrieve the signed certificate along with other certs required to establish the trust chain.
2. Edit the Solr command configuration file to set the
SOLR_SSL_* properties per the instructions in the guide to indicate that SSL/The properties may look something like this:
# Enables HTTPS. It is implicitly true if you set SOLR_SSL_KEY_STORE. Use this config
# to enable https module with custom jetty configuration.
SOLR_SSL_ENABLED=true
# Uncomment to set SSL-related system properties
# Be sure to update the paths to the correct keystore for your environment
SOLR_SSL_KEY_STORE=$SOLR_HOME/keys.p12
SOLR_SSL_KEY_STORE_PASSWORD=[key store password here]
SOLR_SSL_TRUST_STORE=$SOLR_HOME/trust.p12
SOLR_SSL_TRUST_STORE_PASSWORD=[trust store password here]
# Require clients to authenticate
SOLR_SSL_NEED_CLIENT_AUTH=false
# Enable clients to authenticate (but not require)
SOLR_SSL_WANT_CLIENT_AUTH=false
# Verify client's hostname during SSL handshake
SOLR_SSL_CLIENT_HOSTNAME_VERIFICATION=false
# SSL Certificates contain host/ip "peer name" information that is validated by default. Setting
# this to false can be useful to disable these checks when re-using a certificate on many hosts
SOLR_SSL_CHECK_PEER_NAME=true
# Override Key/Trust Store types if necessary
SOLR_SSL_KEY_STORE_TYPE=PKCS12
SOLR_SSL_TRUST_STORE_TYPE=PKCS12
Note that for TeamPage's Solr turnkey installation, the
SOLR_HOME variable should already be set to the traction subdirectory of the Solr installation. You can put the keystore and trust store in any locations you like and reference it here, so long as the user you'll be using to run the Solr service has permission to read those files.Make sure that TLS is working correctly. You can start the Solr service and then review the log files in the server/
https://tp-solr1.example.com .Authentication
Solr supports various methods of authentication, and the details of each are spelled out in their respective sections of the Solr Reference Guide. See the Configuring Authentication and Authorization section.
By default, the Solr 9.
User name:
teampage-solrPassword:
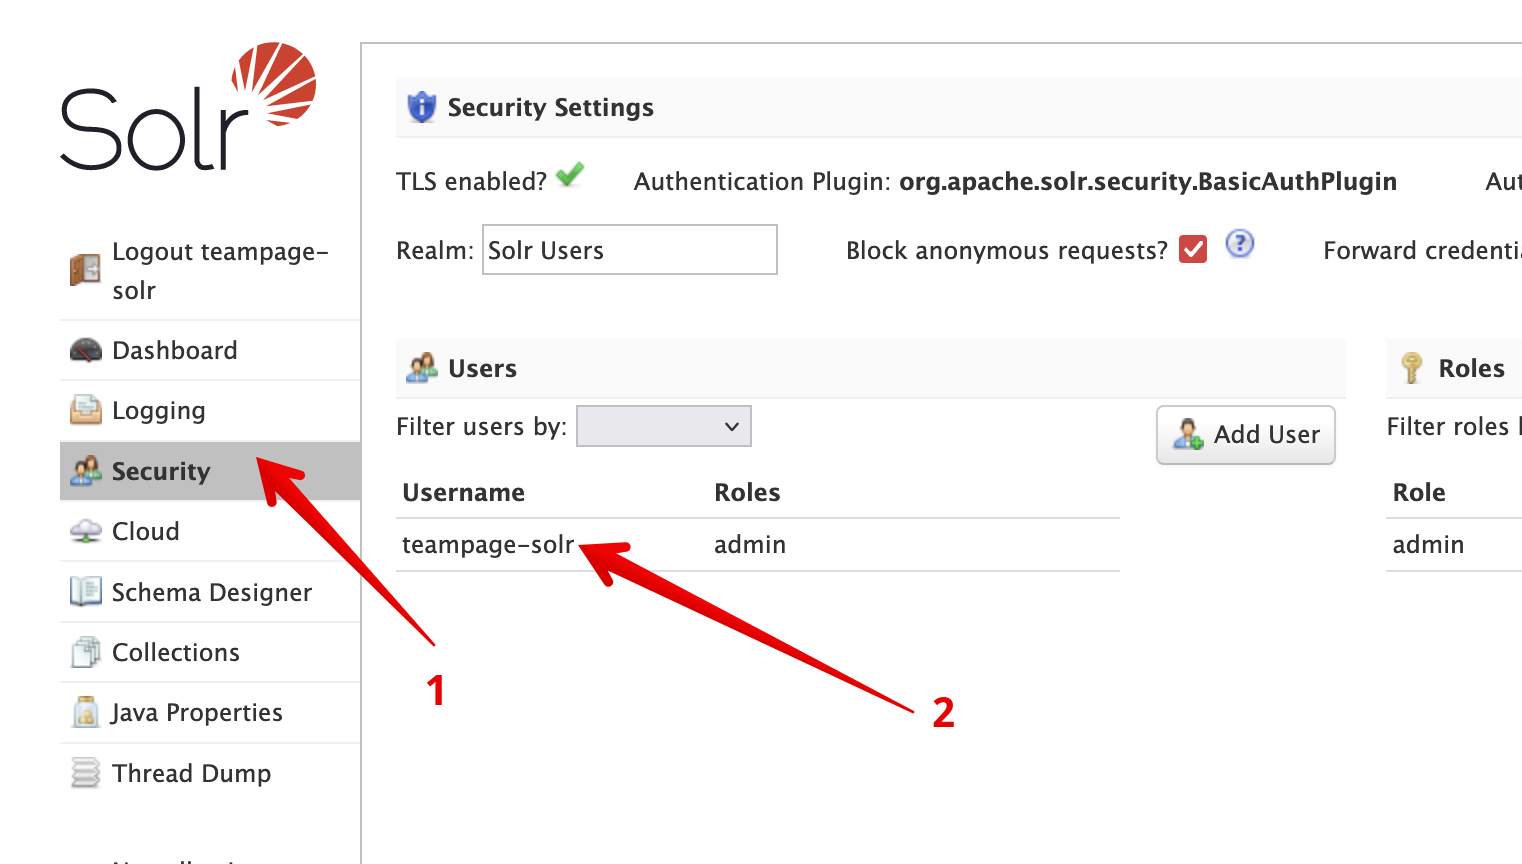
TeamPage@Solr#pa$$w0rdAs soon as you finish setting up Solr, when you start the Solr service for the first time, we strongly recommend that you immediately choose a new password, and store the updated credentials securely in a password manager. To do this, open Solr's admin UI in a web browser (e.
https://tp-solr1.example.com:8983 ); enter the credentials provided above; navigate to the Security page; click the teampage-solr user in the list of user accounts; and choose a new password.You will need these credentials to set up TeamPage to communicate with this Solr service.
You can use the same Security admin UI at any time to add or remove user accounts. If you add new users -- e.
The account TeamPage uses must be assigned at least the security-edit, security-read and edit roles that come pre-loaded with the Solr distribution. If you choose to make a new account for this TeamPage to use, instead of using the default
teampage-solr account, you must assign it the same roles.Custom Authentication Schemes
If you only want to add custom users that will use basic user name + password authentication, we strongly recommend you just use the Security admin UI as described above to set up and configure those accounts.
But if you wish to use a custom or hybrid authentication scheme, you may create your own security.
The TeamPage
com.traction.extsearch.solr plug-in contains an example security.The authorization section sets up the permissions and role for the "teampage-solr" user to ensure TeamPage can use the user account to manage Solr collections and add/
{

  "authentication": {
    "blockUnknown":true,
    "class":"solr.BasicAuthPlugin",
    "credentials": {
      "teampage-solr": "Fto50H+i454wYzPlJwQg4casHdhxJYJ4GwEEAmcFAMk= K14PVBV8zYZt3eDY3aNracVkzc0lLvAweSsZcsNngNY="
    },
    "realm": "Solr Users",
    "forwardCredentials":false,
    "":{"v":3}
  },

  "authorization":{
    "class":"solr.RuleBasedAuthorizationPlugin",
    "permissions": [
      {
        "name":"security-edit",
        "role":"admin"
      },
      {
        "name":"security-read",
        "role":"admin"
      },
      {
        "name":"all",
        "role":"admin"
      }
    ],
    "user-role": { "teampage-solr": "admin" }
  }

}
If you're creating custom accounts that use basic authentication, note that the password value for the user name must be expressed in a special form:
base64(SHA256(password+salt)) [space] base64(salt)You can do this yourself with off-the-shelf utilities built into (or at least optionally available) with most operating systems, but TeamPage's Solr plug-in includes a
GenerateSolrPassword utility program to do it for you. You can run it on a password of your choice to generate the required form (the salt will be created for you randomly).You'll need the
GenerateSolrPassword.class file from the TeamPage Solr plug-in's etc/C:\Program Files\Traction\traction\server\plugins\com.traction.extsearch.solr\etc\solr\util .commons-codec.jar file from the main TeamPage lib folder, e.C:\Program Files\Traction\traction\server\lib.In this example, the TeamPage installation and the Solr installation are located on the same host, so we'll just reference those two files where they are; the TeamPage installation is located at
C:\Traction; and the password is MyBadP@$$w0rd#654:
C:\Traction\traction\server\plugins\com.traction.extsearch.solr\etc\solr\util>C:\Traction\jre\bin\java.exe -cp C:\Traction\traction\server\lib\commons-codec.jar;. GenerateSolrPassword "MyBadP@$$w0rd#654"
lTC0a6YWCAYTP0FWTZocRqdX10tifZMQbRAqBwRPYH0= 5m2r0s3Vz2wr8Q67L+6b+L6eTgM1D8Lr6zCsOAHv1Ys=
We can take the resulting output from this command use it as the password encoding for the
teampage-solr user:
  "authentication": {
    "blockUnknown":true,
    "class":"solr.BasicAuthPlugin",
    "credentials": {
      "teampage-solr": "lTC0a6YWCAYTP0FWTZocRqdX10tifZMQbRAqBwRPYH0= 5m2r0s3Vz2wr8Q67L+6b+L6eTgM1D8Lr6zCsOAHv1Ys=
"
    },

...

  },

...
If you wish, you can also pick a custom user name and substitute that name into security.
Make sure to make a note of the user name and the password you used because you'll need them later (both to specify them in TeamPage Solr setup, and to access Solr's admin UI in your browser).
When you're done modifying security.
You can do this with the bin/
C:\Solr and the security.C:\ folder:
C:\Solr\solr>bin\solr.cmd zk cp C:\security.json zk:security.json -z localhost:9983
Attachments:
security-admin.png
Article: solrsearch59 (permalink)
Date: April 11, 2024; 3:32:23 PM Eastern Daylight Time
Author Name: Dave Shepperton
Author ID: shep
Date: April 11, 2024; 3:32:23 PM Eastern Daylight Time
Author Name: Dave Shepperton
Author ID: shep