Go to the Server Settings > General > Manage Server page and click the "Restart TeamPage" button.
After the restart is complete, make sure that "Dashboard Special Content" appears in the list of installed plugins in the Server Settings > Plugins page.
How to use
Click the "Configure" link of the plugin.
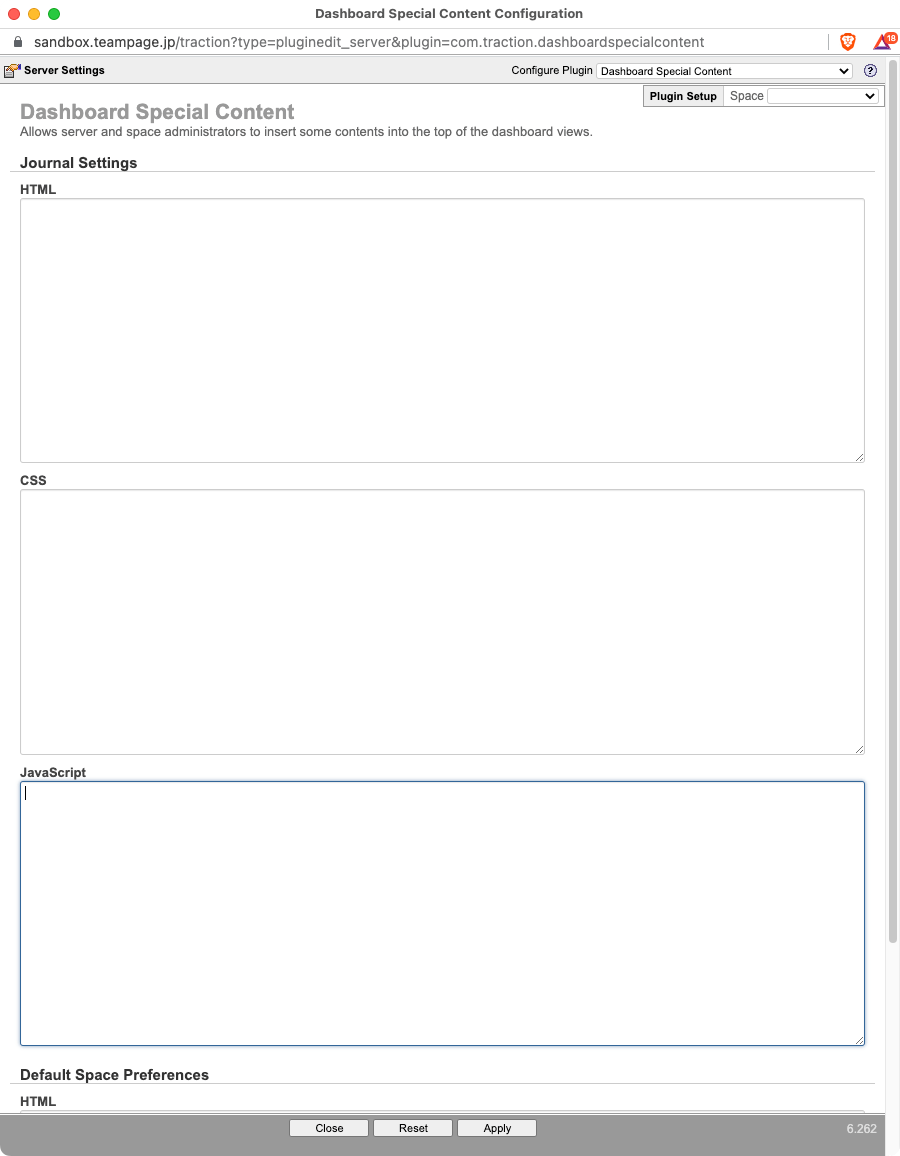
The following configuration view shows up.
Example
As a sample, I'm going to show you how to set up the "All Spaces" dashboard to display four image icons side by side at the top of the dashboard.
(The image files used are "Onebit 1-3 icon set" from Icojam. See this page for details.
Copy and paste the following HTML, CSS, and JavaScript into the fields of the "Journal Settings" on the Settings page and click the "Apply" button.
(You don't have to download the icon files. The icons are included in the plugin's zip file and they will be available after the installation.
HTML
<div class="yui-u">
  <div class="sect">
    <div class="sect-hd">
      <h2>Menu with Icons</h2>
    </div>
    <div class="sect-tip">Click the icons!</div>
    <div class="sect-bd">
      <div class="icons-image">
        <a class="mail" href="javascript:void(0)" title="Mail"></a>
        <a class="calendar" href="javascript:void(0)" title="Calendar"></a>
        <a class="folder" href="javascript:void(0)" title="Folder"></a>
        <a class="smile" href="javascript:void(0)" title="Smile"></a>
      </div>
    </div>
  </div>
</div>
CSS
#dashboard-special-content .icons-image a {
  display: inline-block;
  width: 48px;
  height: 48px;
}

#dashboard-special-content .icons-image a.mail {
  background-image: url('/images/dashboard/icons/mail-icon.png');
}

#dashboard-special-content .icons-image a.calendar {
  background-image: url('/images/dashboard/icons/calendar-icon.png');
}

#dashboard-special-content .icons-image a.folder {
  background-image: url('/images/dashboard/icons/folder-icon.png');
}

#dashboard-special-content .icons-image a.smile {
  background-image: url('/images/dashboard/icons/smiley-icon.png');
}

#dashboard-special-content .icons-image a.smile:hover {
  background-image: url('/images/dashboard/icons/smiley-laugh-icon.png');
}
JavaScript
Proteus.addHandler("load", function() {
  $('#dashboard-special-content .icons-image a').on('click', function() {
    const imgTitle = $(this).attr('title');
    $('#dashboard-special-content .icons-image').after('<div class="you-clicked-msg">You clicked the icon for ' + imgTitle + ' !</div>');
  });
});
Operation Check
The four icons are displayed as shown in the picture below.
When you hover the mouse cursor over the rightmost "Smily icon", the mouth opens, and when you click on an icon, the name of the clicked icon is displayed.
Attachments:
configure.png
configuration_view.png
example.png
Article: Forum7084 (permalink)
Categories: :Doc:plug-in
Date: March 29, 2023; 11:55:51 PM Eastern Daylight Time
Author Name: Takashi Okutsu
Author ID: takashi
Categories: :Doc:plug-in
Date: March 29, 2023; 11:55:51 PM Eastern Daylight Time
Author Name: Takashi Okutsu
Author ID: takashi