Title: Balloon Widget plug-in

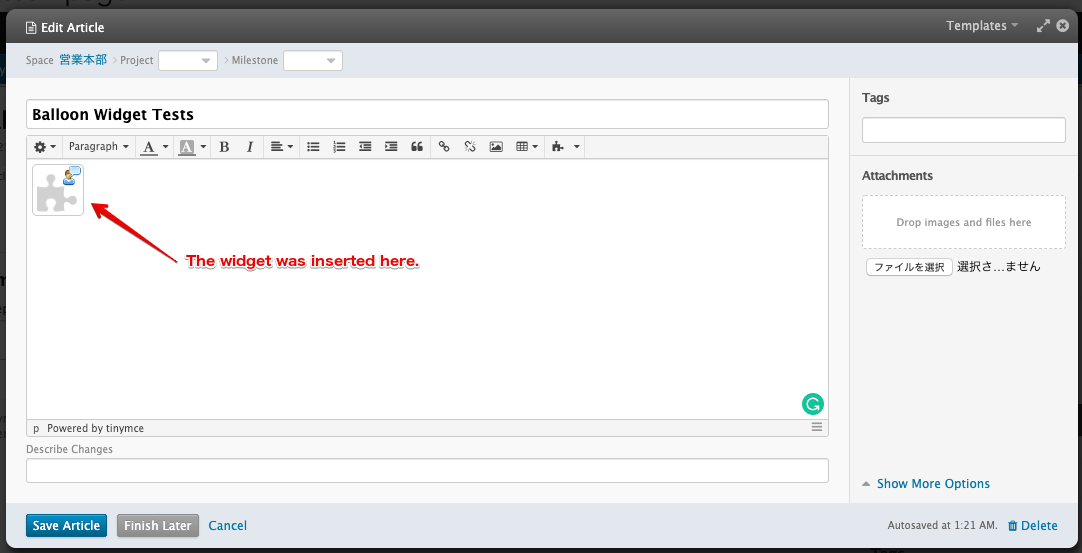
This plug-in provides the "balloon" widget that decorates a sentence like a "cartoon balloon" so that it should be eye-catching.

When you put a summary into your TeamPage entry (article, task, event, etc.
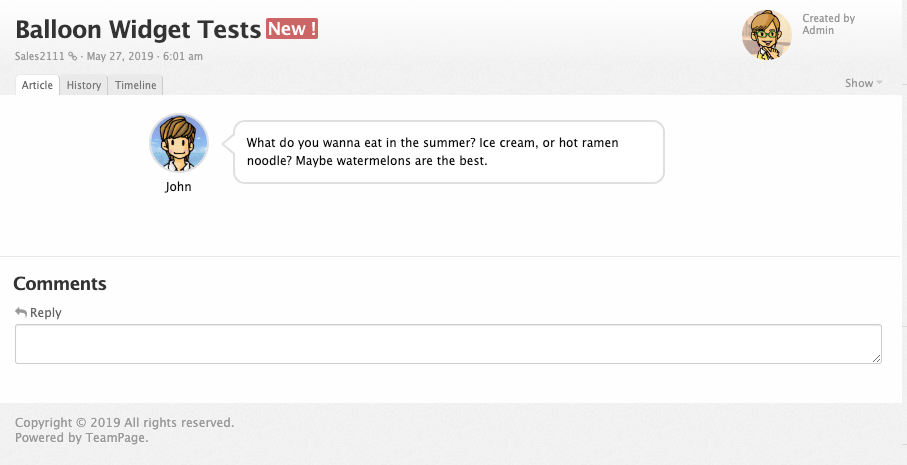
), you may use a dot-list or a number-list. Something like;

However, this kind of summary list could be "boring" because it is just a text description.

On the other hand, the balloon-decorated description is eye-catching. If you put the conversation above between John, Lisa, and Mark into balloons, the "who says what" will be easy to understand at a glance.


John John

Here are two options. Which do you think is better?


I prefer the A. It's really nice.

Lisa Lisa


Definitely B. This must be what we've been looking for.

Mark Mark


* Icons made by Freepik from www.flaticon.com is licensed by CC 3.0 BY

* The example face images are from by 16snow at sozaijiten-busine….


Install


Click the link below to download the .zip file of this plug-in.

Main unit


This zip file contains the "main unit" of the plug-in. It let you put a balloon by writing something like [[ /balloon name="john" say="My name is John." ]] in your entry body content.


Widget


If you want to use the widget for the balloon (the setting dialog to embed a balloon into the body text) instead of writing the command (a.k.a. rapid selector) above, please install the following zip file as well.


How to install


Log in to your TeamPage server and open Server Settings > Plugins. Select the .zip file(s) and upload it.

After upload, you will see the I18N error, but don't worry. This error means just the language files (locale files) have not loaded yet.

Open Server Settings > General > Manage Server page and click the "Restart TeamPage" button so that TeamPage server loads the language files.

If your TeamPage is hosted in Traction's cloud environment, you will need to restart twice.

Then open Server Settings > Plugins page again to find "Balloon Widget" plug-in is available.

How to use


For Server Admins


Please click the [configure] link in the plug-in's slot in Server Settings > Plugins page.

Configure

And modify the names of the characters and the paths of the image files.


Please note that the folder where the images are stored should be readable by everyone. If you upload the images into the Sales space's share folder, for example, the images will not show up when a user who doesn't have the "read share folder" permission open the entry with the balloon.

Without Widget


Type /balloon or /say or /speech in the double brackets with the following options.

(Example) [[ /balloon name="john" align="right" color="red" say="My name is John Smith. Nice to meet you." ]]

The benefit of not using the widget is that you can tell what the character says when you take just a glance at the words= or say= option.

name= or char=


The names of the characters. The defaults are John, Lisa, Mark, Karen, Will, and Olivia. Please select one of these characters by using the name= or char= option. Case insensitive. You can also select one of them by faceN or just N. (N is the number of the character, currently from 1 to 6.)

Server admins can change the names and the images of the characters in the plug-in's configuration view. If the server admin changes the name of the 1st character from John to Dave, you can display the 1st character by name="dave", name="face1", name="1", char="dave", char="face1", or char="1".

words= or say=


The sentence shows up in the balloon.

align=[left] or pos=


Indicates the align of the character and the balloon. The default is left.

color=[gray]


You can select the color of the border of the image and the balloon and the background color of the balloon. The available colors are black, red, orange, yellow, green, blue, indigo, purple, gray, and bluegray.

width=[600]


Indicates the max width of the character + balloon. The default is 600 pixels. The available widths are 400, 500, 600, 700, 800, 900, and 1000 pixels.

picsize=[60]


Indicates the width of the character image. The default is 60 pixels. The available widths are 60, 70, 80, 90, 100, 110, 120, 130, 140, and 150 pixels.

textsize=[100]


Indicates the font size of the balloon text. The number means the percentage. If you select "110" here, the font-size will be 110% larger than the normal one. The default is 100. The available percentages are 100, 110, 120, 130, 140, and 150.

With Widget


The benefit of using the widget is that it's easy to insert it and select options on the dialog.

To insert the widget, select [Insert/Edit Widget] > [More] > [Balloon] menu.

Insert a widget

Fill-in the "words", select the options, and click "OK".

Insert a widget

You will see that the widget is inserted into the body text.

Insert a widget

When you post the entry, you will see the widget is rendered as a character picture + a balloon.

Insert a widget

Live Examples


Character John), default size (60px), default width (600px), default align (left), default color (gray)

[[ /balloon name="john" words="Hello. I'm John." ]]


john John

Hello. I'm John.


Character No.3, size 80px, width 600, align right, color = red.

[[ /balloon name="3" words="Here comes a soul train. Let's dance!" picsize="80" align="right" color="red" ]]


Here comes a soul train. Let's dance!

3 Mark


Character No.5, size 100px, width 700px, align left, color = black.

[[ /balloon char="face5" say="It's hot and humid. Jump, splash, into the water! " color="black" picsize="100" width="700" align="left" ]]


face5 Will

It's hot and humid. Jump, splash, into the water!


Attachments:
configure1.png
configure2.png
widget1.png
widget2.png
widget3.png
widget4.png
chat.png
Article: Forum6999 (permalink)
Categories: :Doc:plug-in
Date: May 27, 2019; 12:43:42 PM Eastern Daylight Time

Author Name: Takashi Okutsu
Author ID: takashi