Title: Setting up HTTPS

TeamPage makes it easy to run with HTTPS using TLS 1.2. Once you're familiar with the basics of How HTTPS Works, follow these instructions to turn on TLS encryption.

Start on the server settings > Network page. Change the value of the first setting in the "HTTP Server" section from "No Encryption" to "TLS Encryption".


When you do this, the message, "TLS Encryption requires a server private key. Click here to manage the private key." appears underneath:


Click the link to open the Server Private Key page in the Manage Trust Store interface; do not click the "Apply" button on the server settings > Network page yet.


If You Already Have a Private Key


If you want to import an existing private key, you'll need a certificate in PEM format and and the private key in PKCS #8 format. You can use OpenSSL to convert them if necessary; see Support3763. You should now have a .pem file and a .p8 file.


Click the browse buttons and select each file, then click import, and confirm that the signed key now appears in the list with the correct information.

Creating a Private Key


If you don't already have a signed private key, TeamPage can create one for you; just click the "Generate" button:


You will be prompted to enter these details about your organization, and choose the key algorithm, the key size (in bits), and the key lifetime (time before expiration in years):


Be sure to fill out all the organizational details correctly.

Common Name


This is the most important field. You must enter the permanent address of your server, normally its (internal or external) DNS address. For example, if you're using a server currently on http://teampage.example.com (to become https://teampage.example.com), you must enter teampage.example.com. Keep in mind that this is meant to be the host name, not a URL, so do not include any port designation such as :80, :443, :8080.

If the address portion of the URL does not exactly match what you enter here, even though you pay for a certificate to be signed, browsers will not accept the certificate, so be sure to use the correct DNS name here.

If you do not have DNS set up or another permanent address for your server, you can still proceed with HTTPS configuration, but the browser will not accept the certificate if the address in the URL doesn't match the address you enter here.

Organizational Unit


Typically a division of an organization, often used for a branch of the company or a specific location. In many cases, this will be left blank.

City, State, Country Code


These should correctly match the location of your organization. Keep in mind that users may inspect the certificate to see these details. See the example below.

Key Algorithm


TeamPage supports RSA and DSA. If you have no reason to select DSA, select RSA.

Key Size


This is the number of bits in the generated key. Longer keys present a greater barrier to people trying to decrypt the data. We recommend 2048 bits.


Expiration


Choose how long you want this key to be valid. The limit is 10 years, and we recommend that for simplicity you select a 10 year term.

When you have completed and carefully reviewed all fields, click the "Generate Key" button. The Server Private Key page should now show the details for your private key.


Activate HTTPS


Note: You do not have to activate HTTPS right away; you can do this later once you have a signed certificate, but you can activate it as early as now.

To activate HTTPS now, switch back to the server settings > Network page and press the "Apply" button.

At this point, your server is now in HTTPS mode. Most browsers indicate this by showing a lock icon in the status bar: . Due to the way HTTPS KEEP-ALIVE works, you may be able to continue talking to the server for a limited time without changing the URL, but the communication is now encrypted.

Note that it is typical for HTTPS servers to run on port 443; your preferred configuration may call for a different port. In either case, now may be a good time to change the port number using the Port setting on the server settings > Network page. You may also choose to change the port at a later time. While it is not necessary to change the port number, it is not recommended to run TeamPage in HTTPS mode on port 80, which is usually reserved for ordinary HTTP services.

If you have chosen to activate HTTPS, before continuing, we suggest you change the URL from http: to https:. If you changed your port number to 443, you will no longer need a port number on your URL; if you changed your port number to any other number, you will need to make sure that it is on the URL and that it correctly reflects that port number, e.g., https://teampage.example.com:9443.

If you have activated HTTPS at this time, unless you imported a signed certificate instead of having TeamPage creating one for you, the first thing you will see is a warning from your browser.


You can prevent this dialog by getting your certificate signed (next section). If you would rather not get your certificate signed, you can click View Certificate to show the certificate. In Internet Explorer, this looks like:


If you would like to tell your browser to trust this certificate (and not warn you) you can install the certificate in the browser.

Getting your Certificate Signed


To generate a Certificate Signing Request (CSR), return to the Server Private Key page in the Manage Trust Store dialog and click the Certificate Signing Request Generate button.


This will show a CSR.


You can then copy and paste this into a CA's CSR form. For example, using InstantSSL, this looks like:


Note: TeamPage won't likely be listed as a server software selection, but what you select shouldn't make a difference.

You can fill in the additional pages, usually just contact and credit card information. Often your certificate will arrive in email within 10 minutes.

Often what you get back is a .zip file containing all the certificates in the certificate chain.


You should unzip this file in preparation for the next step.


In this case, the top-level CA is GTECyberTrustGlobalRoot, then ComodoSecurityServicesCA.

Importing the Signed Certificates


The order you take the next steps in matters; first you must import the certificates that establish the trust chain to your signed certificate, then your signed certificate.

Importing the Trusted Certificates (Trust Chain)


In our example, we need to build the chain from GTE down through Comodo to our certificate, still using the "Server Private Key" page in the "Manage Trust Store" dialog. We'll start by importing the GTE Trusted certificate. We can optionally add an alias before clicking the "Add" button:


The certificate appears in the list along with the private key.


We repeat the process for the subsequent certificates down the chain. If you don't get the order exactly right, don't worry; as long as all the trust chain certificates are added before your own certificate is imported, TeamPage should be able to determine the order of the chain.

Here we have imported both trust certificates.


Importing the Actual Signed Certificate


When importing this file, you need to use the Import Signed Certificate section's Import button.

Browse to the file and click Import.


TeamPage should report that the import was successful:


Also, the entry for your private key should now look different; rather than just reporting the basic details, it should now show the entire certificate chain:

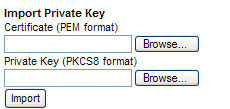
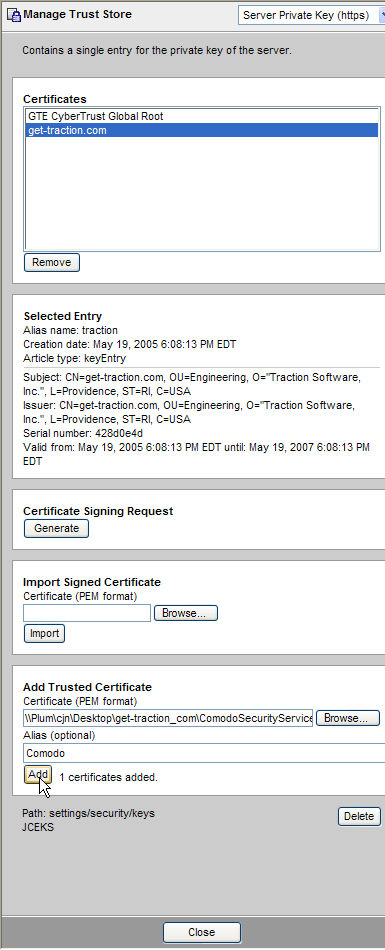
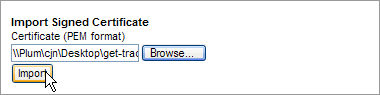
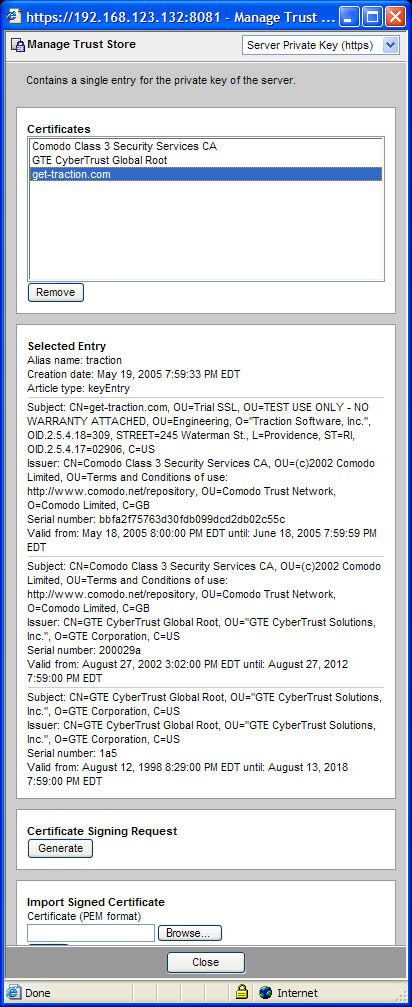
Before Importing Signed Certificate

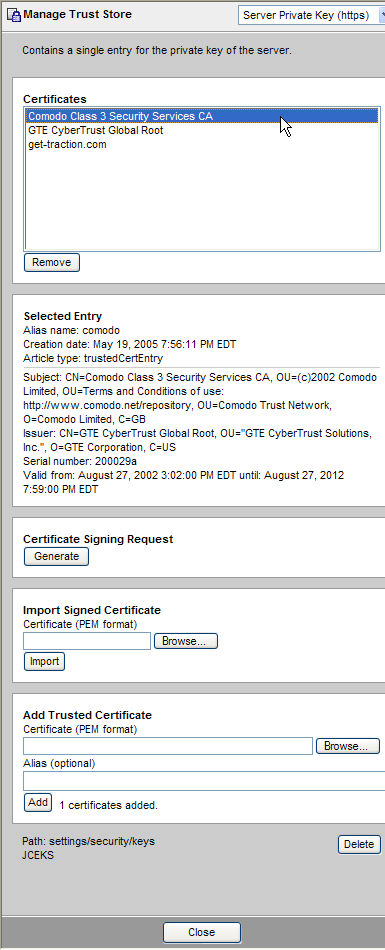
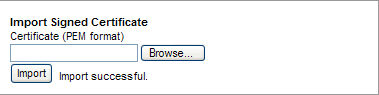
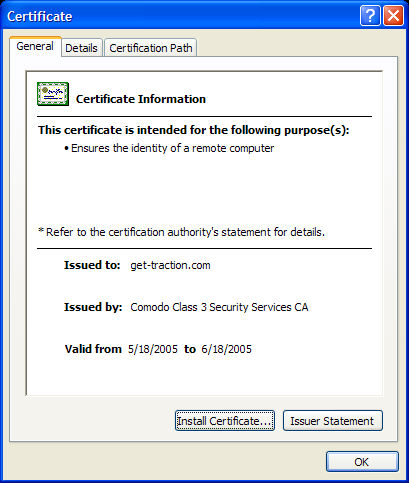
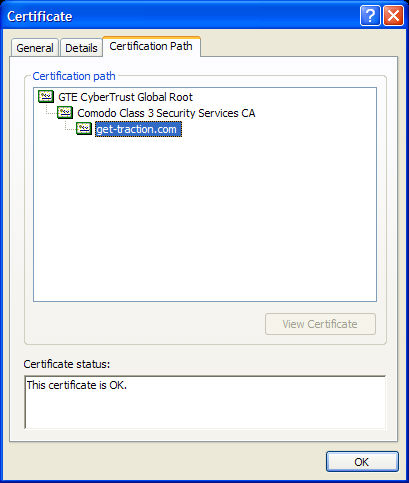
After Importing Signed Certificate


Now when you close all your browser windows and reopen the web browser, you should not get any warnings. If you click the lock icon to inspect the certificate, you will see the details. The status will be listed as OK. You will also be able to see the expiration date.


In this case, the free trial certificate is valid for 30 days.

Normal HTTPS setup is now complete.

Updating an Expiring Certificate


In most cases, the CA you used to get your original certificate will keep your CSR on file, and you can just return to that service to request an updated certificate with a later expiration date.

If you need to generate a new CSR, you can simply return to the "Server Private Key" page of the "Manage Trust Store" dialog, find the "Certificate Signing Request" and click the "Generate" button. Then you can follow the same procedure described above to take that CSR to a CA to obtain an updated certificate. Once you have the updated certificate and any other certificates required for the trust chain, you can proceed as above in the "Importing the Signed Certificates" section.

If Your Private Key Has Expired


If your private key is expiring, it cannot be signed again, and you will need to create a new key with a later expiration date and have that signed. To do this, start on the "Server Private Key" page of the "Manage Trust Store" dialog, click the "Remove" button and acknowledge the prompts. This removes the signed private key.

You will then start over with the steps above beginning with the "Creating a Private Key" section.

Restoring a Private Key Store from Automatically Created Backups


TeamPage creates a snapshot of the keystore as it was before each modification you make. If you need to revert to a previous state of the private key store, follow these steps:

1. Shut down TeamPage.

2. Open the keystore directory, which will be in your installation's server/settings/security folder.

3. Find the appropriate backup. based on its date stamp and serial number -- e.g., "keys-20220809-001" -- that you wish to re-instate.

4. Move aside the current "keys" file -- we recommend renaming rather than deleting, at least until after step 7 below.

5. Copy the appropriate backup file to "keys".

6. Restart TeamPage.

7. When the server is online, you should be able to verify that the certificate it's using for HTTPS is the one from the backup copy of the keystore. If this checks out, you can delete they backup of the "keys" file you created in step 4.


Attachments:
image623.jpg
image767.gif
image624.jpg
image625.jpg
image768.gif
image627.jpg
image628.jpg
image629.jpg
image769.gif
image630.jpg
image631.jpg
image771.gif
image772.gif
image632.jpg
image636.jpg
image635.jpg
image637.jpg
image638.jpg
image639.jpg
image640.jpg
image641.jpg
image642.jpg
image644.jpg
image643.jpg
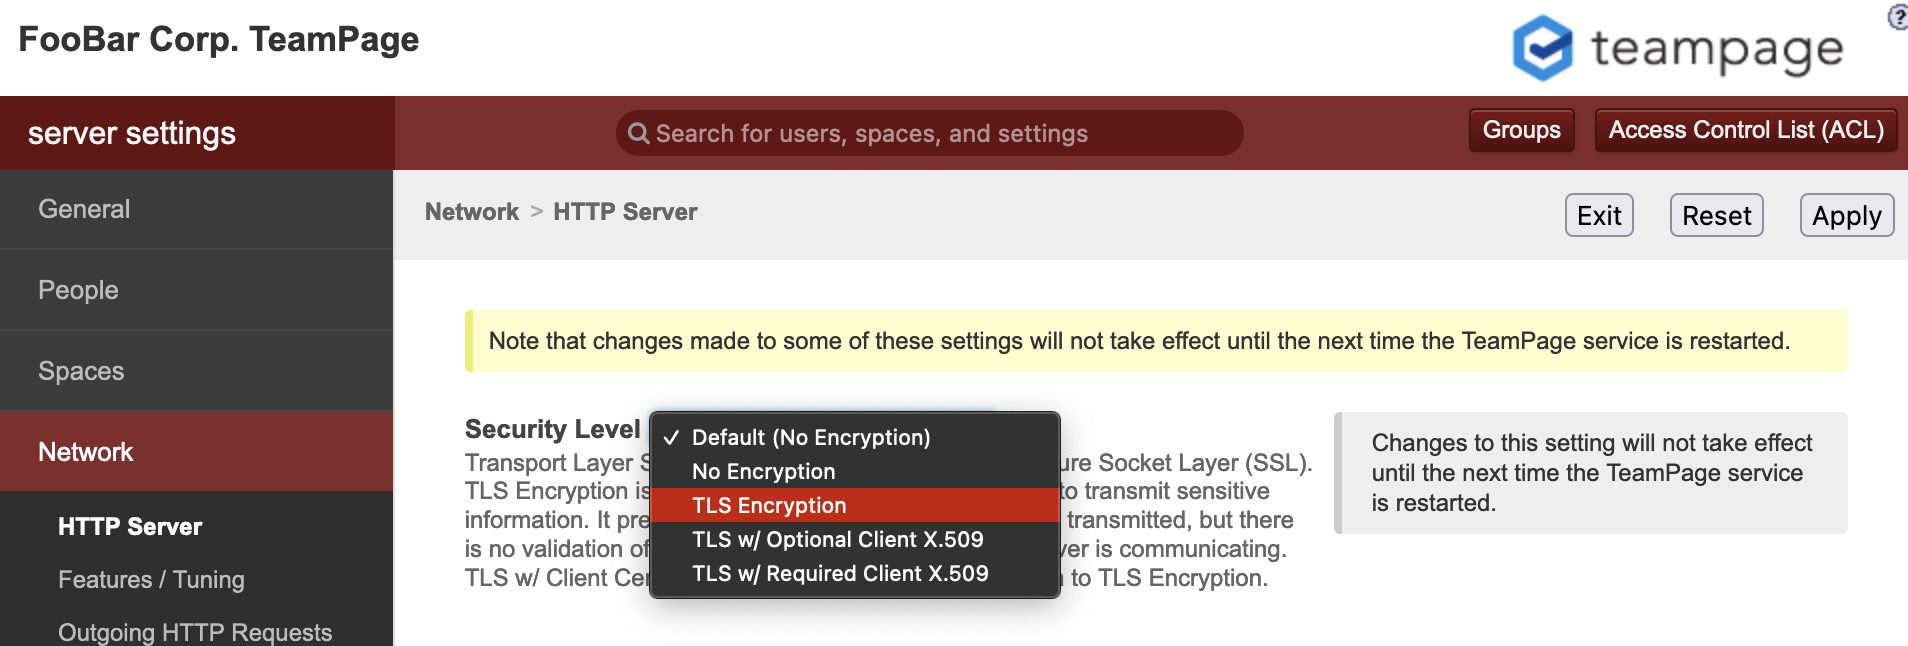
security-level-setting.png
private-key-manager.png
trusted-certs-store.png
Related Articles
Article: Doc264 (permalink)
Date: March 22, 2008; 4:19:33 PM Eastern Daylight Time

Author Name: Documentation Importer
Author ID: importer